Easy as one, two, three(literally)

I won’t discuss why you need VPN or how many VPN types are out there. Since this is AWS specific topic I will only explain what’s related in this context, browse either OpenVPN or Zscaler, they have comprehensive doc about VPN in general.
0. Prerequisite PKI
We gonna create our own CA(Certificate Authority) to generate signed SSL certificates for clients and servers using the OpenVPN’s easy-rsa. Clone the repo to get started, initialize PKI(Public Key Infrastructure) by running this
./easyrsa3/easyrsa init-pkiYou will get a new folder call pki, then you need to provide CN(Common Name) information for your new CA, could be fully qualified domain name (FQDN) (e.g vpn.yourservername.com) or unique identifier (e.g vendorX, clientY) or leave a blank if you don’t want to.
When creating your passphrase, you can use any ASCII character except #, $, or %. Otherwise your private/xxx.key file will be empty. (but you should use nopass in this case, bec ACM won’t accept encrypted one)
./easyrsa3/easyrsa build-ca nopassnopass simply m eans that the generated certificate’s private key will not be encrypted with a password (this is essential to import into ACM).
Generate server key and cert.
./easyrsa3/easyrsa build-server-full server.yourservername.com nopassGenerate client key and cert.
./easyrsa3/easyrsa build-client-full client.yourservername.com nopassYou should be able to see your client/server files in following paths-
// CA
easy-rsa/pki/ca.crt

// Client
easy-rsa/pki/issued/client.yourservername.com.crt
easy-rsa/pki/private/client.yourservername.com.key

// Server
easy-rsa/pki/issued/server.yourservername.com.crt
easy-rsa/pki/private/server.yourservername.com.key
1. Import certs to ACM
Setup your cli/console/terminal to import those cert to AWS ACM, basically export out AWS access key, secret key and SESSION token. Then you need to import .crt and .key files using acm cli —
aws acm import-certificate --certificate fileb://pki/issued/server.yourservername.com.crt --private-key fileb://pki/private/server.yourservername.com.key  --certificate-chain fileb://pki/ca.crt

aws acm import-certificate --certificate fileb://pki/issued/client.yourservername.com.crt --private-key fileb://pki/private/client.yourservername.com.key  --certificate-chain fileb://pki/ca.crt
2. Create client VPN endpoint
I assume VPCs and other related network resources has been provisioned, it could be totally private VPC (without public subnet at all), or standard half public, half private subnets. Go to VPC, Client VPN endpoints and Create client VPN endpoint.
In Details, Client CIDR block must be of size /12 or smaller. i.e it should be overlapping with existing VPC CIDR range. e.g if you’re VPC CIDR is 172. your VPN CIDR could be on 192. and still able to communicate.
In Authentication information,
- Choose Server certificate ARN to your server.yourservername.com.
- Choose Authentication options to Use mutual authentication.
- Choose Client certificate ARN, to client.yourservername.com.

User-based auth is if you have AD or Federated authentication. Definitely recommend to turn on Connection logging, won’t cost that much.
4. Turn on Enable split-tunnel (IMPORTANT!!!)
TLDR; “By default, when a VPN connection is established between a client device and a client VPN endpoint, all traffic from the client device is routed over the VPN tunnel. You can use a split-tunnel client VPN endpoint when you do not want all user traffic to route through the client VPN endpoint.” AWS.
In short, you send through traffic matching the specific routes of VPC CIDRs (most of the time, 10.x.x.x, 172.x.x.x and 192.x.x.x.) but any other traffic through the public internet.

3. Configure Client VPN
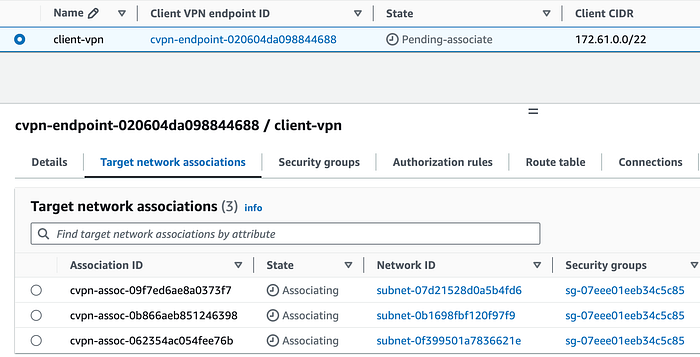
3.1 Target Network Associations
After Client VPN endpoint(s) is created, it State will be Pending-associate, go ahead and pair with desire VPC’s subnet(one by one), there is no way you can associate in bulk manner, it’s on subnet level. This would take a few mins.
3.2 Authorization rules
To avoids Routing Conflicts between VPC and client VPN, we set different private CIDR ranges when we create client VPN. By defining 172.31.0.0/20 (assuming youre VPC is 172.16.0.0/12) in the authorization rules, you’re explicitly allowing VPN clients to access all resources within that VPC range.

You can now download vpn client file “Download client configuration” which is .ovpn file format & import into VPN client software, feel free to use OpenVPN client which is more robust than AWS client.
3.3 Edit VPN file
Now, let’s edit that .ovpn file to match with this format please notice we only need <cert> and <key> session from respective files.
client
dev tun
proto udp
remote cvpn-endpoint-00000000000000.prod.clientvpn.region.amazonaws.com 443
remote-random-hostname
resolv-retry infinite
nobind
remote-cert-tls server
cipher AES-256-GCM
verb 3
<ca>
-----BEGIN CERTIFICATE-----
.....CONTENT....
-----END CERTIFICATE-----
</ca>
<cert>
-----BEGIN CERTIFICATE-----
.....COPY PASTE FROM pki/issued/client.yourservername.com.crt...
-----END CERTIFICATE-----
</cert>
<key>
-----BEGIN PRIVATE KEY-----
.....COPY PASTE FROM private/client.yourservername.com.key.....
-----END PRIVATE KEY-----
</key>

reneg-sec 0

verify-x509-name server.yourservername.com name
Now import your downloaded-client-config.ovp, packages in/out in UI means you’re successfully connected. Please be mindful about “Your private IP” this could be within 192. if you’re following along and “Server public IP” with UDP like we set.
This setup would allow your to authenticate using your own CA, securely connect to your aws workloads, the setup will also work if your subnets are private. If you have limited IP ranges in your VPC (client VPN must not be larger than /12 or smaller than /22.) use self hosted openVPN.
Hope it’s useful and have a good one.
